Five Effective Poses For Easing Menopause Symptoms (APARNA MUKHERJEE) (हिंदी में भी उपलब्ध)
Many women have found that menopause is a difficult phase to go through. Therefore, incorporating yoga for menopause may improve the undesirable side effects.
Most menopausal women experience,
Hot flashes,
Stress,
Depression,
Lack of sleep.
Here are a few specific yoga poses that may relieve these menopausal symptoms.
Why Yoga Poses Are Essential For Reducing Menopausal Symptoms?
During menopause, every female complains about these signs,
Stomach upset,
Constipation,
Digestive issues,
Bone problems, and
Muscle loss.
To ease these signs, practicing yoga poses that are designed for menopausal women can be effective.
Five Sure-Shot Menopausal Yoga Poses
1. Marichi’s Pose:
Sit on your mat and keep your legs in the extended form in front of you. Make sure to keep your toes pointed in the upward direction. Then, bend your left knee and move it while your foot is resting on your mat. Place your left shin behind or in your left armpit.
Hold onto a belt or a yoga strap. As you are ready, reach your left arm around the outside of your left leg and reach for your back. At this time, your right arm should also reach back, trying to touch the belt or strap. Leave as much room between your hands as your body allows.
2. Head-To-knee Forward Bend:
Sit on the mat, stretching your legs. Now, bend your right knee and move it so that the bottom of your foot is up against your left thigh. Imagine making four shapes with your body.
Keep your belly button at the center of your left leg and bend at your groin as you try to touch your head to your knee. If your knee on your left leg does not touch, put a towel underneath for support.
Now, take your belt or yoga strap and wrap it around the bottom of one foot and pull your chest to your leg, letting the strap to help support the stretch. Your next progression is to have your arms stretched out and grab your left foot for a further and deeper stretch.
3. Shoulder Stand:
Lie down on your mat. Consider adding two folded blankets under each shoulder for support. Now, slide your hips up against the wall and straighten your legs against the wall. Bring your toes to your nose. If this pose feels too easy, start doing the next exercise.
Your next progression is to hold the legs in the air unassisted by the wall.
Start by lying down on your mat. Consider adding two folded blankets under each shoulder for support. Now, slide your hips up against the wall and straighten your legs against the wall. Bring your toes to your nose. If this pose feels too easy, start doing the next exercise.
Your next progression is to hold the legs in the air unassisted by the wall.
Now, start by lying down on your back and lifting your hips off your mat. Make sure to keep your arms next to your body with your palms facing down.
Begin the process of getting your legs in the air by lifting one leg at a time. After using your palms to leverage yourself and lift one leg, bring your hands to your lower back to create a stable shelf for your balance. Now, with this shelf in place, lift your other leg as well.
Keep in mind not to turn or move your head back and forth as you do this pose. All you need is to just keep your neck straight and fix your gaze upward to avoid neck injuries with this pose.
4. Downward Facing Dog:
Keep your hands and knees on the mat with your hips and knees lined up and your hands directly under your shoulders. Now, curl your toes under and straighten your leg as much as you can as you push up with your hands.
If your heels do not rest flat on the ground, not to worry. Keep your heels as close to the floor as you can. With constant practice, you will become more flexible and your heels will eventually touch the floor.
Drop your head so your ears line up with your shoulders and lean into the stretch. As you relax your back muscles, you may feel more tightness in your legs.
5. Bridge Pose:
Place the yoga mat and lie flat on your back. If needed, place a supportive blanket under your neck and shoulders. With your hands flat on the mat, keep your palms down, and bend your knees to put your feet flat on the mat as well.
Place your heels as close to your buttocks as possible and then lift your buttocks off your mat. Underneath your lifted body, bring your hands as close as you can. If you can, try to hold your hands and clasp them together.
Lift your pelvic area as high as possible, stay on the tops of your shoulders, and use your arms as support by pressing into the mat. Keep your chin up to the sky while you breathe. Hold on to this pose for one minute.
Final Thoughts
Every yoga pose comes with its own share of benefits. You can ease off your menopausal signs by practicing the aforementioned yoga poses.
————————————————————-
मेनोपॉज़ के लक्षणों को कम करने के लिए पाँच असरदार आसन (अपर्णा मुखर्जी) (हिंदी में भी उपलब्ध)
कई महिलाओं ने पाया है कि मेनोपॉज़ एक मुश्किल दौर होता है। इसलिए, मेनोपॉज़ के लिए योग को शामिल करने से अनचाहे साइड इफ़ेक्ट्स में सुधार हो सकता है।
ज़्यादातर मेनोपॉज़ वाली महिलाओं को अनुभव होता है,
हॉट फ़्लैश,
स्ट्रेस,
डिप्रेशन,
नींद की कमी।
यहाँ कुछ खास योग आसन दिए गए हैं जो इन मेनोपॉज़ के लक्षणों से राहत दिला सकते हैं।
मेनोपॉज़ के लक्षणों को कम करने के लिए योग आसन क्यों ज़रूरी हैं?
मेनोपॉज़ के दौरान, हर महिला इन लक्षणों की शिकायत करती है,
पेट खराब होना,
कब्ज़,
पाचन संबंधी समस्याएँ,
हड्डियों की समस्याएँ, और
मांसपेशियों का कमज़ोर होना।
इन लक्षणों को कम करने के लिए, मेनोपॉज़ वाली महिलाओं के लिए बनाए गए योग आसन असरदार हो सकते हैं।
मेनोपॉज़ल योग के पाँच पक्के आसन
1. मरीचि आसन:
अपनी मैट पर बैठें और अपने पैरों को सामने की तरफ़ फैलाकर रखें। ध्यान रखें कि आपके पैर की उंगलियाँ ऊपर की तरफ़ हों। फिर, अपने बाएँ घुटने को मोड़ें और जब आपका पैर मैट पर टिका हो, तो उसे हिलाएँ। अपनी बाईं पिंडली को पीछे या अपनी बाईं बगल में रखें।
एक बेल्ट या योगा स्ट्रैप पकड़ें। जब आप तैयार हों, तो अपने बाएँ हाथ को अपने बाएँ पैर के बाहरी हिस्से से घुमाएँ और अपनी पीठ तक पहुँचें। इस समय, आपका दायाँ हाथ भी पीछे की ओर पहुँचना चाहिए, बेल्ट या स्ट्रैप को छूने की कोशिश करते हुए। अपने हाथों के बीच उतनी जगह छोड़ें जितनी आपका शरीर इजाज़त दे।
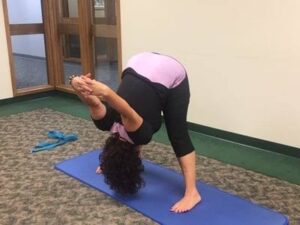
2. सिर से घुटने तक आगे की ओर झुकना:
मैट पर बैठें, अपने पैरों को फैलाएँ। अब, अपने दाएँ घुटने को मोड़ें और उसे इस तरह हिलाएँ कि आपके पैर का निचला हिस्सा आपकी बाईं जांघ से सटा हो। अपने शरीर से चार आकार बनाने की कल्पना करें।
अपनी नाभि को अपने बाएं पैर के बीच में रखें और कमर से झुकते हुए अपने सिर को अपने घुटने से छूने की कोशिश करें। अगर आपके बाएं पैर का घुटना नहीं छूता है, तो सपोर्ट के लिए नीचे एक तौलिया रख दें।
अब, अपनी बेल्ट या योगा स्ट्रैप लें और उसे एक पैर के निचले हिस्से में लपेटें और अपनी छाती को अपने पैर की ओर खींचें, जिससे स्ट्रैप स्ट्रेच को सपोर्ट करने में मदद करे। आपका अगला कदम है अपनी बाहों को फैलाना और अपने बाएं पैर को और गहरा स्ट्रेच करने के लिए पकड़ना।
3. शोल्डर स्टैंड:
अपनी मैट पर लेट जाएं। सपोर्ट के लिए हर कंधे के नीचे दो मुड़े हुए कंबल रखने के बारे में सोचें। अब, अपने हिप्स को दीवार से सटाएं और अपने पैरों को दीवार से सटाकर सीधा करें। अपने पैर की उंगलियों को अपनी नाक तक लाएं। अगर यह पोज़ बहुत आसान लगता है, तो अगली एक्सरसाइज़ करना शुरू करें।
आपका अगला कदम है बिना दीवार के सहारे पैरों को हवा में ऊपर उठाना।
अपनी मैट पर लेटकर शुरू करें। सपोर्ट के लिए हर कंधे के नीचे दो मुड़े हुए कंबल रखने के बारे में सोचें। अब, अपने हिप्स को दीवार से सटाएं और अपने पैरों को दीवार से सटाकर सीधा करें। अपने पैर की उंगलियों को अपनी नाक तक लाएं। अगर यह पोज़ बहुत आसान लगे, तो अगली एक्सरसाइज़ करना शुरू करें।
आपका अगला स्टेप है कि आप बिना दीवार के सहारे पैरों को हवा में रखें।
अब, अपनी पीठ के बल लेटकर और अपने हिप्स को मैट से ऊपर उठाकर शुरू करें। ध्यान रखें कि आपकी बाहें आपके शरीर के पास हों और आपकी हथेलियां नीचे की ओर हों।
अपने पैरों को हवा में उठाने का प्रोसेस एक बार में एक पैर उठाकर शुरू करें। अपनी हथेलियों का इस्तेमाल करके खुद को सहारा देने और एक पैर उठाने के बाद, अपने बैलेंस के लिए एक स्टेबल शेल्फ बनाने के लिए अपने हाथों को अपनी पीठ के निचले हिस्से पर लाएं। अब, इस शेल्फ को अपनी जगह पर रखकर, अपना दूसरा पैर भी उठाएं।
ध्यान रखें कि इस पोज़ को करते समय अपना सिर आगे-पीछे न घुमाएं और न ही हिलाएं। आपको बस अपनी गर्दन सीधी रखनी है और इस पोज़ में गर्दन की चोटों से बचने के लिए अपनी नज़र ऊपर की ओर टिकानी है।
4. डाउनवर्ड फेसिंग डॉग:
अपने हाथों और घुटनों को मैट पर रखें, आपके हिप्स और घुटने एक लाइन में हों और आपके हाथ सीधे आपके कंधों के नीचे हों। अब, अपने पैरों की उंगलियों को नीचे की ओर मोड़ें और अपने हाथों से ऊपर की ओर धक्का देते हुए अपने पैर को जितना हो सके सीधा करें।
अगर आपकी एड़ियां ज़मीन पर सीधी नहीं टिकती हैं, तो चिंता न करें। अपनी एड़ियों को जितना हो सके ज़मीन के पास रखें। लगातार प्रैक्टिस से, आप ज़्यादा फ्लेक्सिबल हो जाएंगे और आपकी एड़ियां आखिरकार ज़मीन को छूने लगेंगी।
अपना सिर नीचे करें ताकि आपके कान आपके कंधों के साथ एक लाइन में आ जाएं और स्ट्रेच में झुकें। जैसे-जैसे आप अपनी पीठ की मसल्स को रिलैक्स करेंगे, आपको अपने पैरों में ज़्यादा टाइटनेस महसूस हो सकती है।
5. ब्रिज पोज़:
योगा मैट बिछाएं और पीठ के बल सीधे लेट जाएं। अगर ज़रूरत हो, तो अपनी गर्दन और कंधों के नीचे एक सपोर्ट देने वाला कंबल रखें। अपने हाथों को मैट पर सीधा रखते हुए, अपनी हथेलियों को नीचे रखें, और अपने घुटनों को मोड़कर अपने पैरों को भी मैट पर सीधा रखें।
अपनी एड़ियों को जितना हो सके अपने बटक्स के पास रखें और फिर अपने बटक्स को मैट से ऊपर उठाएं। अपने उठाए हुए शरीर के नीचे, अपने हाथों को जितना हो सके पास लाएं। अगर हो सके, तो अपने हाथों को पकड़कर उन्हें आपस में जोड़ने की कोशिश करें।
अपने पेल्विक एरिया को जितना हो सके ऊपर उठाएं, अपने कंधों के ऊपर रहें, और मैट पर दबाव डालकर अपनी बाहों को सपोर्ट के तौर पर इस्तेमाल करें। सांस लेते समय अपनी ठुड्डी आसमान की ओर रखें। इस पोज़ को एक मिनट तक बनाए रखें।
आखिरी विचार
हर योगा पोज़ के अपने फायदे होते हैं। आप ऊपर बताए गए योगा पोज़ की प्रैक्टिस करके अपने मेनोपॉज़ के लक्षणों को कम कर सकती हैं।